Wednesday, January 31, 2018

Computer Assisted Art Next Lesson Inspiration

Inspiration for next project


Image may contain: 1 person

1.  Create a digital picture of a face using one of the sites below.
-https://www.faceyourmanga.com/editmangatar.php
https://www.pizap.com/emoji_maker
bitmoji
http://www.marvelhq.com/create-your-own-super-hero
http://www.rinmarugames.com/playgame.php?game_link=mega-anime-avatar-creator
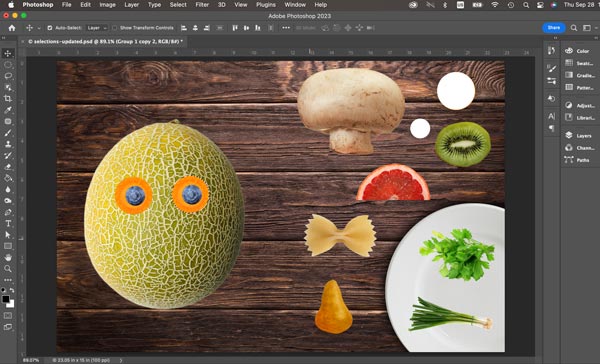
 2.  Open photoshop.
Click the print screen button on the keyboard.
Click EDIT<Paste in photoshop.
Use the CROP TOOL and crop out any extra.
Image will be about 2.5 inches by 2.5 inches
Try out different ADJUSTMENTS<Brightness & Contrast <Hue & Saturation < Levels 

3. Try out different FILTERS

4.  PRINT OUT 2 COPIES


Watch the tutorial below...we will be creating one of these on MONDAY.  You will need an inspiration picture.  Print Picture and Turn in to MRS HURD please :D

Monday, January 29, 2018

Crafts Class- Weaving Continued


Below's lesson instructions were adapted from http://afaithfulattempt.blogspot.com/.

Crafts Class- Weaving Continued...

PAPER WEAVING WITH A TWIST

What you will be creating:  Students, you will be creating a drawing made from two artworks.  The process will combine two of your artistic creations, into one masterpiece through weaving. 

Directions:  
First, you will need to find an image on the computer.  The image should be copied and pasted into Microsoft word and resized to fit the entire sheet of computer paper.  You will need to print the image out 2 times.

Second, you will watch Mrs. Hurd's tracing demonstration and copy the image to "good" drawing paper two times.  This will result in two exactly identical drawings.  See example below.

Third, you will color each of the two drawings slightly different.  You may choose to use two different color schemes, or for each picture.Related image

Fourth, you will make one of the artworks the warp, and one of the artworks the weft.  You will then weave them together to create one original work of art.


Fifth, sign and date the bottom right corner of your artwork, and turn in to Mrs. Hurd.

More Student Examples:


Tuesday, January 23, 2018

Psychedelic Art-Drawing Class


Current Project 1/23/18...

  • Create profile picture in class to use as a proportion guide for the project.

SIDE PROJECTS TO WORK ON AND THINK ABOUT...

  1. Personal Art History Story in the sketchbook...Start with your earliest art-making memory.  Include any type of art-music, painting, drawing, play-doh, band, instruments, acting, choir etc..
  2. Sketchbook Cover Design
  3. Week 4 Sketch- Edible objects DUE FRIDAY!!!

Friday, January 19, 2018

Computer Assisted Art- Making Stencils

Graffiti Tutorials: Stencil Making from Kaleb Redden on Vimeo.

1.  Find a simple image to turn into a stencil.
2.  Watch video and follow instructions in photoshop
3.   Remember to save!!!
4.   Remember all the white areas should be touching to create the stencil.  You may have to add text to make this happen.
5.   Print 2 copies and turn in.

Tuesday, January 9, 2018

Pop Art with Computer Assisted Art


Computer Assisted Art
Directions:  Follow along with the tutorial and complete your Pop Art inspired Portraits.
Make sure you save and print a black and white version, and save and print a color version to your student folder.


Computer Assisted Art POP ART

Computer Assisted ART- Today's ASSIGNMENT
Directions:

1.  Watch provided video and copy the vocabulary terms on the provided handout.  Turn in to the turn in tray when finished.  Remember to put your name on it.


2.  Next, go to lab 109....Find a picture, save the picture in your student file as a jpeg.  Follow the step by step handout.


Wednesday, January 3, 2018

Sketchbook Ideas to Make your book better!!!

Here are some old and new ideas... the earlier ones in the list are more simple than the later ones.
  • Outside vs Inside
  • Object suspended in colored dish detergent
  • Pile of pillows
  • Fabric with a pattern
  • Childlike drawing made into fine art
  • Close up to abstraction
  • Insets, drawings within a drawing
  • How it works: Inner workings of a machine
  • A word and visual description
  • Contour line drawing using only letters: Repetition
  • Masking tape patterns and color
  • 2 old drawings torn apart and made new
  • Draw on top of an old drawing
  • Insects
  • Man made vs natural
  • Opposites collage
  • Less than an inch (small objects in repetition)
  • Mechanics of an object…create a drawing as a designer would have first drawn it
  • A chair as a self portrait
  • Mundane
  • Accidents…random acts of art
  • Exaggeration
  • Value study with dried up markers
  • 5 Drawings on top of each other
  • Numbers: How many ways
  • Geometric COLLAGE:
  • Linear Line Drawing of Organic Objects
  • Jim Dine: TOOLS
  • Negative Space Only
  • How do I love art: Let me count the ways!!
  • I hate these things!
  • Dirty water drawing with Sharpie (weighted line)
  • Drawing with colored paper
  • Only object I found at this location_____? Collage Design only, No other media.
  • Dots to Drawing: Only a pencil eraser and ink... Stamp your heart out!!
  • Non – Objective
  • Oops, Wrong Color?
  • Lonely…Object
  • Messiest vs cleanest
  • Contradiction
  • Ballpoint pen only!!
  • Everything in my backpack... Wow me!!
  • Music to my ears.
  • Normal
  • Not Normal
  • Plugged in.
Interior: Non-traditional, no buildings... more like the inside of a purse
Extreme light source
Shoes as a portrait
Refuge
Extreme perspective
Organic
All that and a bag of chips
Reflective Identity
One of these things are not like the other one
Hanging or suspended
Free Space
Yesterday
Do you dream in color?
10 things I love about you. (take off of the movie... they are to merge 10 objects that express who they are)
I also like to give the words that they do not know as a prompt and they have to look up the definition
Additional Sketchbook Assignments

Contour Line Portraits


Great Inspirational Video and Inspiration Student Examples HERE!


A contour is an edge or an outline of an object.  The purpose of contour line drawings is to become more aware of the outlines of forms and figures. -Draw a continuous line without lifting the...

Tuesday, January 2, 2018

Selection Tools...The Basics


Computer Assisted Art

Directions:
1.  Right Click and save image as a jpeg to your student folder
2. Open the program Adobe Photoshop on the computer
Create a new file that is 8.5 inches x 11 inches, and 150 ppi


3.  We will be using the selection tools for this exercise.  The selection tools are located next to each other.  We are going to use them all for this project.  Some of them will be much easier than the others, but it is important that you try them all.


The first group of selection tools is called "Marquee Tools".
Rectangular and elliptical marquee tools will let you make rectangular or circular selections.
Single row and Single column tools will let you select a row that is 1 pixel high or a column that is 1 pixel wide.
Use the Elliptical Marquee tool to select the circle

To make a round selection you just click and drag the cursor over the area that you want to select.
Try it.
If you want to select a perfect circle (or a perfect square) hold SHIFT while dragging.
If you want to start your selection from the center out hold Option (Alt) button.
If you want both of these options (perfect circle drawing from the center) hold both keys.
Try it!!!
Now zoom in the area with the blueberry. Select it.


Duplicate the two shapes, and now you should have two eyes.