Monday, December 19, 2016

Thursday, December 8, 2016

Computer Assisted Art-Caricatures


  1. car·i·ca·ture
    ˈkerikəCHər,ˈkerikəˌCHo͝or/
    noun
    1. 1.
      a picture, description, or imitation of a person or thing in which certain striking characteristics are exaggerated in order to create a comic or grotesque effect.
      "a caricature of Jimmy Durante"
      synonyms:cartoonparodysatirelampoonburlesqueMore


    See below examples...


Directions:

1. Find a picture of a teacher from F.C.H.S.  
It would be best if you could use your phone and snap an original picture.  Expressive pictures work well-smiley, angry, grouchy, sad, etc...

2. Look for characteristics that stand out.  Later we will emphasize these features.

Now open a new document in Photohop
size 8.5 inches  x 11 inches 200 ppi

Open found teacher image in photoshop.
Select the teacher, copy, and paste into the new document
(use the magic wand, or the quick selection)

You should now have a white background, with a teacher on another layer.

Mrs. Hurd's example caricature: 


RESEARCH TECHNIQUES:
Here are two that I found, but you can research and find videos that you like too :D


Monday, December 5, 2016

Computer Assisted Art

Assignment:  Create an interesting, and original yearbook cover.
THEME:  The seasons (Fall, Winter, Spring)

TITLE:  A Walk to Remember

UNITY- horse shoes on a path through out cover design

Mrs. Hurd's Example Below:


Think about adding:
FILTERS
DRAWINGS/SILHOUETTES
CHANGING BLENDING MODES (OVERLAY, MULTIPLY, COLOR BURN)
CHANGING HUE/SATURATION on layers
ADDING PATTERNS


Size:
Width:  17.5 overall
            Front: 8.75, spine: .5, back: 8.75 add 1/4" to bothl edges for wrap.
Height: 11.75 includes the 1/4" wrap top and bottom. 


Cutting Edge Compositions:

Wednesday, November 30, 2016

Intro to Art-Letters

Intro to Art
Architectural Letters


After this project...

I can conceive and create works of visual art that demonstrate my understanding of how the communication of my ideas relate to the media, techniques and processes.

I can create artwork that uses organizational principles and functions to solve specific visual arts problems.

I can apply subjects, symbols and ideas in my artwork and use the skills gained to solve problems in daily skills.


Monday, November 28, 2016

Crafts Class Totem Poles

Totem Poles

Just for fun, I found a quiz.  This might inspire you on what animal to use for the project.  Click on the link below.

Link:  What is your spirit animal?


ASSIGNMENT:
After viewing the power point & taking notes visually and verbally, you will need to create 3 thumbnail sketches.


Also if you missed anything in class here is a copy of the power point.


Wednesday, October 19, 2016

Computer Assisted Art/Junkyard Treasure Project

Old cars, junk yard cars, antique cars, and classic cars....This is the theme for our next project.  Please use google images and find an old dilapidated car/vehicle/object.  The goal is to try and find beauty in unexpected places.  Remember to follow the link if you can to get the highest quality image. Save the original image into your folder or jump drive.

Directions:
1. Open Photoshop
2. <File<Open<Find saved image
3. <Image< Image Size<unconstrained proportions<8 width  x 10 height inches (10 width x 8 height for landscapes)<200 pixels per inch


4.  If you image now looks smooshed- hold ctrl + T and resize to correct the smooshed look....see below...


Much Better!

5. Double Click layer- rename Original  


<Layer< Duplicate Layer< Name Layer Brightness/Contrast
>Image < Adjustment < Brightness Contrast
Use the toggles and adjust to your liking


6.  <Layer < Duplicate< Name Layer Posterize
<Image<Adjustment< Posterize
Adjust to your liking


7.  <Layer < Duplicate< Name Layer Cut out
<Image<Filter< Artistic<Cutout
Adjust to your liking


8.  Now adjust the BLENDING MODE OPTIONS ON EACH LAYER.
You may also rearrange the layers by dragging them into place.


9.  Save image as a PSD file-Photoshop File into your student folder

10.  Print 2 copies- 1 b&w 1 color

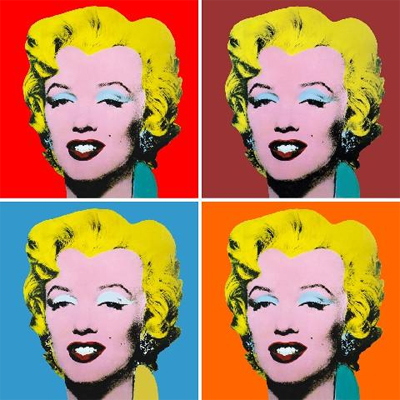
Here is another edit-  I created a blank layer and filled it with newspaper texture and then I created another layer with canvas texture.  On both I adjust the blending modes.


Monday, October 17, 2016

Grid Drawing With Mrs. Hurd

HOW TO RESIZE

1. Resize reference Photo:
Find image via the internet.  Up-close, high contrast images work best.
Copy and Paste into Microsoft Word

Double Click Image to see photo editing options


2. RESIZE to 6 in x 8 in
Drag the toggles to resize image- make it 4x6 or 6x8 (vice versa if your image is in portrait instead of landscape).
If the image needs adjusting, click on corrections

3.  PRINT 2 COPIES  (ONE WITH GRID & ONE WITH OUT GRID)


Computer Assisted Art

Surrealist Collage's Created by Mrs. Hurd's Computer Assisted Art Class

Tuesday, October 11, 2016

Crafts Class

Collage Landscapes
col·lage
kəˈläZH/
noun
  1. a piece of art made by sticking various different materials such as photographs and pieces of paper or fabric onto a backing.
    • the art of making collages.
    • a combination or collection of various things.


Today-    Find a picture of a landscape via google images.
Follow the link to the image- so that you get the biggest file possible.
Save image as a jpeg to your student folder.

Below are some examples of collage landscapes.

Tomorrow-  I will demonstrate how to deconstruct your landscape in photo shop.

Painted paper landscape collage?:

Surrealist Collage

Directions-
Google Image Search Surrealist Collage
Find a couple that you like, and mentally plan out how you want your collage to look and try to think of a theme.


Image result for surrealist collage
This example depicts a surreal collage in the theme of Alice in Wonder Land.


We will be creating a collage.  A collage is a technique of an art production, where the artwork is made from an assemblage of different forms, thus creating a new whole.

Today I would like for you to find and save:

1 BACKGROUND IMAGE
7 OBJECTS/THING/PEOPLE

Next delete all the background around the objects.  Use the marquee tool, quick selection tool, magic wand tool, or the magnetic lasso tool. ( I will demonstrate.)


*TIP- Remember you can hold down the alt or the ctrl key while you click to either subtract or add to you selections.


Tuesday, October 4, 2016

Computer Assisted Art: Surrealism/Dali

Directions:
Today you will create a FACTS pages in your sketchbook/notebook.  Use the links below to learn all about the Surrealist art movement.

I would like for your page to include notes about the art movement and when/why it was popular.
Please tell me about the art work characteristics (what did it look like?), and what types of materials the artist used.  What types of things inspired surrealist artists?
Also please list some of the artists that were involved in the movement.
Please print out or draw a picture of Salvador Dali and print out 2 examples of his artwork.
(he is going to be our inspiration for the next project)
Define these terms somewhere on your fact page:   Surrealism, Surrealist Manifesto, Automatic Surrealism, Frotage, Decolomania


Monday, October 3, 2016

Painting O'keefe Assignment

Directions:
Monday- Create 1 full research page about Georgia O'keefe and her work.  Below is an example.  You may type out facts and pictures, cut them out, and glue them down or you can free hand it and write down fact.

The research page should contain-
Birth/Death
Career Facts
Artwork Facts
Pictures


Wednesday, September 14, 2016

One Point Perspective

Directions:
Monday- Finish drawing out room in one point perspective.  Save and Print.
                      Next research Van Gogh Paintings, and watch the below youtube videos.
                      Add color using the PAINT BUCKET, and the brush tool.
                      Try out different BRUSHES, and different FILTERS to create a painterly effect like Van Gogh did.  This project will be due on Friday.
 Drawing should be done by Tuesday, bursh work, color, and filters done by Friday.


Friday, September 9, 2016

Gustav Klimt Inspiration for Crafts

Adele Bloch-Bauer / Woman in gold --- safe-frame.com from Sebastian Cosor on Vimeo.
theartVIEw - Klimt: Up Cose and Personal at Leopold Museum from theartVIEw on Vimeo.


Crafts

Directions:  Look at the above video clips.Gustav Klimt is our inspiration for the next project: WIRE TREES. Eventually you will create a tree sculpture using various wires.  Be thinking about what kind of tree you would like to create, and what will you make the leaves out of?  Paper, Beads, Feathers, Found Objects, Buttons, Sticks, Leaves, etc....

Today: In your sketchbook create a bio page for Gustav Klimt.  You may use any information that you find here on the blog, or you may google his bio too!
Carefully think about how you are going to arrange the information.  How are you going to decorate your page and include all the facts?

 Image result for visual notes


HELPFUL LINKS:
http://www.iklimt.com/
http://www.theartstory.org/artist-klimt-gustav.htm

Sketchbook page should include:

  • Birth/death
  • Place of origin (Where did he come from, where did he live?)
  • How many brothers and sisters did he have?
  • What types of colors did he use in his paintings?
  • What did he like to paint the most?
  • His style of painting
  • What was his most famous painting?  How much did it sell for?
  • Print off an example of one of his works of art that you like, cut out and glue into your sketchbook (no nudes please)
  • What types of patterns or motifs did he use?
  • Was he a dog person or a cat person?
  • Define Sculpture in the Round

Image result for visual notes

VanGogh Project Computer Assisted Art


BIO VIDEO


Van Gogh Shadow // Luca Agnani from luca.agnani on Vimeo.
PROJECT INSPIRATION VIDEO


Computer Assisted Art

Directions:  Look at the above video clips. Vincent Van Gogh is our inspiration for the next project. Eventually you will create a room using one point perspective, in the style of Van Gogh.  Be thinking about what kind of objects you will put in your room...a bed, pictures, furntiture, windows, curtains, molding, etc..

Today: In your sketchbook create a bio/definition page for Vincent.  Please use the provided power point and videos for you information.
Carefully think about how you are going to arrange the information.  How are you going to decorate your page and include all the facts/definitions?

Image result for visual note taking 101

Sketchbook page should include:

  • Birth/death
  • Place of origin (Where did he come from, where did he live?)
  • Mental state
  • What types of colors did he use in his paintings?
  • What did he like to paint the most?
  • What was his style of painting?  What are movement was he apart of?
  • What was his most famous painting?  
  • Print off an example of one of his works of art that you like, cut out and glue into your sketchbook (no nudes please)
  • What makes Vincent Van Gogh's work so unique?
  • How did his life effect his style?
  • Include definitions from the list below.


COMPUTER ASSISTED ART VOCAB:
1.Perspective
2.Foreshorten
3.Vanishing Point
4.Horizon Line
5.One Point Perspective
6.Vincent Van Gogh

7.Post Impressionism


Tuesday, August 30, 2016

Monday, August 29, 2016

Computer Assisted Art

Monday's Assignment:

Pop Art Portrait.

1.  Go to PIXLR.com- Use Editor
Open saved image

2.  Follow Part One of Tutorail.---DON'T FORGET TO SAVE!!

3.  Print and turn in to Mrs. Hurd.


Thursday, August 25, 2016

Friday 8/26 Computer Assisted Art VOCAB


1.   First, use the definitions below to complete your Vocab Worksheet.


2.  Next, Its time to find a reference photo for you to work with on Monday.  Below is an example of Andy Warhol's Marilyn Monroe Portrait.  Your finished project will look similar.  


Image result for andy warhol art

3.  When trying to choose a photo- look for something with High Contrast.You may use a personal photo, or a photo from the internet.

The photo must be saved to your school folder, or google docs.


*TIP

I found typing in these for a search was helpful:

Expressive Photography
High Contrast Portraits
Expressive Portraits


3.  When all that is finished I would like you to go to 
PIXLR.com-  Practice opening your saved image, and then practice using different tools (from the vocab list) on that image....such as the marquee tool, the move tool, and crop tool.  I have provided a list of  pixlr tools with labels below.


We will be using this program along with photo shop to create our pop art inspired portraits next week.

Print off your practice work and turn it in along with your vocab list to Mrs. Hurd.

Tuesday, August 23, 2016

Pop Art with Computer Art

Computer Assisted ART- THURSDAY'S ASSIGNMENT
Directions:
Watch provided video.  Next we will complete provided handout together in class.  Turn in to the turn in tray when finished.

Please bring a set of headphones or ear buds next week to class.  You will need them for demo's and videos.


Friday, August 19, 2016

Welcome Back & Open House

Welcome back students! I am so excited for a fun year full of new assignments, and projects!
Here is a little bit about the Art Department...


Below I have a video on how to create your very own artist portfolio.  This will help you easily take projects home, and store projects for your portfolio assignment.


How to make a portfolio - Created with Haiku Deck, presentation software that inspires;

aRtrOOm RuLEs...


Tuesday, May 17, 2016

Graphic Design & Computer Assisted Art


Directions:
Watch the following tutorial.  Look at the list below, and create a pop art style poster to advertise the different courses offered in art at f.c.h.s.  The poster should have a the class title, teacher (Mrs.Hurd), and an image/focal point- all of which should be in the pop art style (like the tutorial).


Monday, May 16, 2016

Art Room Rules


Art Room Rules - Created with Haiku Deck, presentation software that inspires;

How to make an artist portfolio!


How to make a portfolio - Created with Haiku Deck, presentation software that inspires;

Monday, May 9, 2016