Thursday, April 30, 2015

Soft Sculpture Project

Crafts Class (Senior's Last Project)
Update: Paper Patterns and Cutting out fabric.

Pick out fabric.  Look through fabric bin.

Look at your sketch and figure out what 3-D shapes you want to make.

Draw out the shapes.  Each shape is probably going to be cut out at least twice (front and back)....

Pin patter to fabric and cut out.

Monday: We will review the ppt in class together.  Next we will go to the computer lab.
Once there you are to-
  1. Finish Worksheet #1Research & Sketch
  2. •Print References
  3. •Finish Worksheet #2Drawing & Plan
  4. •Bring in old clothes, fabric & notions for next class
    What are notions?  Buttons, beads, sequins, etc...


Tuesday, April 28, 2015

Watercolor Portraits

Graphic Design
UPDATE


Yesterday you created a new 8x10/200 ppi document.  The document should have 6 different layers.  Each layer should have a watercolor splatters or drips with no background (all the white was deleted using the magic wand tool).

Today you will begin to create a watercolor portrait.
In this assignment you are to turn three high contrast, interesting, and complex portraits into a watercolor interpretation.

You will be graded on:  Composition:  Good use of space, High Contrast Images, How well the image translates using this technique, Are facial fetures readable and clear (eyes, nose, mouth, hair, clothes, etc...)  Effort:  took time to develop idea & complete project? (Didn't rush, or get on youtube all hour)  Good use of class time?  Maintained positive attitude throughout project; compliant; listend and followed directions.  Details:  Did you go avove and beyond the minimum requirements?  Did you find your own textures, papers, and details?

Lets Get Started!


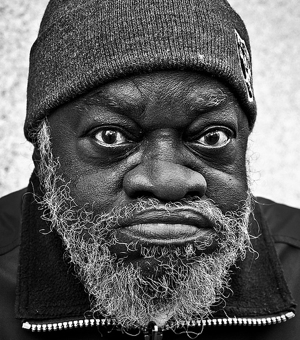
First find an image that is high in contrast and in black and white- EXTREME HIGHLIGHTS AND SHADOWS!

TIPS
* I googled black and white photography and found this image.* Close up images work the best
* Google search black and white photography or high contrast portraits
* Look for highlights and interesting shadow shapes

* Concentrate on the whole picture- the composition. 
* You may even want to crop image into a pleasing arrangement


Open photoshop and create a new 8x10/ 200 ppi document.
Open your photo you found.  Ctrl + T to resize.
Create a duplicate layer of your image.
At this stage you should have a blank white background, and two layers with your photo on them.
Name the layer above the bacground orginal.
Name the layer abaove that High Contrast/ Filter Layer.
Adjust the high contrast layer using <Image<Adjustments<Brightness Contrast
Use a filter on this image.  For the first one use cutout, but you can experiement with your other two pictures.  <Filter<Artistic< Cutout
Create a Duplicate Layer of this cutout layer, name it threshold.
<Image<Adjustments<Threshold<152
Select Multiply for blending mode and merge both the cutout filter layer and the threshold layer.
Open watercolor file
Select all and copy
Paste onto the merged layers
At this point you should have a background, orginal, high contrast filter layer merged, and a watercolor layer.
Go to the High Contrast/FIlter layer merged- CTRL + A (Select All) Then hit CTRL + C (Copy)
Click layer mask
Pres Alt + Click on layer mask (you should see white)
Hit Ctrl + V (Paste), and then Ctrl + I (Invert Colors)
Click back on the image
Choose a paper texture.
Copy and Paste paper texture on top of your layers; select blending mode such as linear burn.
Add extras and details- more splatters, shadows, etc...
Repeat all steps two more times to create a totoal of three portraits.
Save images and email jpegs to Mrs. Hurd


Still Confused???
Try out these links for more info

https://www.youtube.com/watch?v=Rs0NFNpdzwY
http://retnokurnianingsih184.blogspot.com/2012/10/creating-abstract-watercolor-wallpaper.html

Monday, April 27, 2015

Traveling Gnome Assignment

Introduction to Art

Day 1:  Today we will be learning how to draw a gnome.

Everyone should get out thier sketchbook, pencil, and an eraser.  We will follow along and draw a gnome.

LET'S GET STARTED!


Here are my examples from the guided dawing during 7th and 8th hour!


Day 2:
Brainstorm using this worksheet.  You may work in pairs.  We will be going to the computer lab to find a picture for your traveling gnome.  Where will your destination be?


Day 3:  We will grid and begin drawing our polaroid of you very own traveling gnome!


Tuesday, April 21, 2015

Texture Mapping

Graphic Design:
Read throught the ppt below.  After you read the ppt answer the following questions via email-  Copy and paste question into an email, answer, and send to Mrs. Hurd.  Some answers are review of PS tools. 25pts.  Due by the end of the hour!  

Begin on the 6 images when finished with the questions.  The final images will be due at the end of class on Monday.


1 What is texture mapping?
2 Who uses texture mapping?
3 What movie had over 2500 visual effects using texture mapping?
4 What element played a critical role in creating those effects?
5 How will you remove part of the texture layer to fit the image better?
6 Where are the blending options located in Photoshop?
7 How do you change the blending options?
8 Where can you find the option to adjust the hue/saturation?
9 What is your favorite blending mode?
10 How do you create a duplicate layer?
11 How do you create a new layer?
12 Where is the layer masks located?

Email the 6 finished projects to Mrs. Hurd.
Include how you achieved effects in the email. 100pts.


Friday, April 17, 2015

Manimal Experiment

Here is my finished example.
It includes:

Clone Tooled animal face
Text with overlay
(like previous project)
Background
Drop Shadow
Duplicate layers with blending options & filters
Shape Tool Shapes


What does yours have?????

Don't forget to include that in the email with your jpeg.


Graphic Desgin:
Please read through the power point and follow the instructions.
You will be creating a "Manimal" (a combination of a celebrity and an animal).  This exercise is a review of the clone tool.
Document Size: 8.5 x 11
                        200 ppi

*Tip:  I opened up two blank documents in photoshop each 8.5 x 11 200 ppi
From there I copied and pasted each image onto it's own document.
CTRL + T to resize to fit

Here is a screen shot of mine in progress-


Good Luck!


Tuesday, April 14, 2015

Colored Pencils in Photoshop

Directions:  Graphic Design kids, read through tutorial and follow the directions.  Email finished work. Ask questions as needed, but make sure you read the instructions first!

Monday, April 13, 2015

Graphic Design -Animal out of Letters


Student Examples:

Project:  Create an Animal out of letters

Picture
Picture
Using your knowledge of the Free Transform Tool in Photoshop and changing colors/size/style of fonts, you will create an animal based on the shapes of the letters.

1, Find an image of animal (in profile) and place into an 8.5 x 11  300 ppi document
2. Create a new layer.
3. Choose a font to use and type the name of the animal
You may want to do each leter on a different layer to better control the size and shape.
4. Right click and rastersize the type layers when you are satisfied with font selection and color.
5. Use the free transform tool, and stretch and distort the font until it matches the size and shape of the animal you have chosen.
6.  When you have successfully created the shape of the animal, place a solid background below the animal text.
7.  Save as a jpeg and send to nhurd@fchsmules.com

Requirements
Document size is 8.5 x 11 200ppi
2 Colors only (Image is one color background is 2nd color)
Use Animal profile only
Final images should match style of images shown
Due end of class on Tuesday
Picture


Friday, April 10, 2015

How to add an overlay to text...


Gold leaf pattern/texture


Graphic Design:
Directions- 1. Find an interesting photo.
2. Think of an interesting saying that will enhance the photo.
3. Find an interesting texture.
I have provide the gold leaf texture, but you may choose any that you like....brick, marble, metal, etc...
4. Follow the instructions below.  Email your finished project to nhurd@fchsmules.com.