Friday, January 29, 2016

Typography ANimal Rubric


Directions:  Please right click, copy and paste image into microsoft word.  Print & complete rubric.  Turn in to Mrs. Hurd and email photoshop file to nhurd@fcshsmules.com.
Have a great weekend!


Tuesday, January 26, 2016

Intro To Art Plastering like George Segal!


This week students were introduced to Sculptor George Segal!  He is famous for his life size plaster castings.  Many of you may know of his famous "Bread Line" sculptrure infront of the Franklin Delano Roosevelt Memorial in Washington D.C. See pictures below.
Students have the option to plaster cast their face, or their hands :)


Thursday, January 21, 2016

Graphic Design Alphabeasties

Typography: Alphabeasties
Graphic Design Projec
t


Watch Typography PPT, take notes, & turn into Mrs. Hurd
Project Challenge:  Create an animal of your choice out of the the letters the animal spells!
Example:  Bird- B   I    R   D- you could use one or all of those letters.
Use the font you installed from early in the week.

Tools:
Adobe Photoshop
Pen tool
Type Tools (Typing inside an area, Typing along a path/outside of shape, etc)
The Internet (To find an image of an animal only)
You may use two colors + black + white
1 letter, 1 font or 1 word 1 font


Step1: Finding an Animal or Insect
  • Using the internet find a picture of your animal. (Google image search)
  • Save the image of your animal to your folder.
    Right Click> Save Image As> Name and <Save
  • Open up Adobe Photoshop
  • Open up your saved animal picture (File > Your Folder> Your Image)
  • Go to View > fit to screen or (ctrl+0)
Step 2:  Setting up your work area in Photoshop
  • Go to File< New
    Change size to around 8.5x 11 inches 200 ppi
  • Go to Window> History (Drag History box to right hand side of screen)
  • Copy & Paste Animal or Insect onto this layer. Ctrl+ T to resize.
  •  Select Magic Wand Tool/ Quick Selection.  Delete the background if necessary.
    Holding SHIFT down while using the mouse adds to selection
    Holding ALT down while using the mouse subtracts from selection
    Name this layer animal with no background.
  • Create a new layer.  Fill layer white with paint bucket tool.
Step 3:  Using the Pen Tool & the Type Tool
  • Change opacityof the all white layer to around 65%
    This will help you see what lines to trace with the pen tool.
  • Watch Pen Tool Demos- Links are listed below.
  • Select and hold down the Pen Tool.  A menu will appear, select Desired Pen
  • Draw lines and fill in with text.  Vary the size, shape, or color of font.
  • DON"T FORGET TO SAVE YOUR PATHS
    to save double click on path and name it.

    You can move your anchor points and toggle wands by holding ctrl key.

DEMO VIDEOS WATCH THESE VIDEOS!!*http://vimeo.com/15421858*http://vimeo.com/4482686


TIPS & TRICKS to REMEMBER:
CTRL- SPACEBAR to zoom
CLICK for a corner point
CLICK and DRAG for a curve
Place points at curve mid points
Hold CTRL to adjust existing points
Must close the path to finish
Double click paths palette to save while holding space bar
Hold Spacebar down to move image


HERE IS WHAT YOUR LAYERS PANEL SHOULD LOOK LIKE.....
 HERE IS WHAT YOUR PATHES PANEL SHOULD LOOK LIKE.....


Thursday, January 14, 2016

Design your own Font!

Graphic Design Class

1. Follow google docs link to the fonts folder.
https://drive.google.com/folderview?id=0ByOCbDZ6pxjqQWVHZThibGxEWGs&usp=sharing
2. Find your pdf font file. (I had to scan them twice- the one with a 2 next to it, or the bigger file is the one you want.)
3. Save to your drive or class folder.

4. GO to http://www.myscriptfont.com/
5. Upload pdf file.
6. Install font if possible.
If not email nhurd@fchsmules.com the font TTF file.


Monday, January 11, 2016

Graphic Design


Email Mrs. Hurd finished photoshop file.  nhurd@fchsmules.com and Print out a copy with name in lower right corner to turn in to Mrs. Hurd.


Friday, January 8, 2016

Intro to Art- Personality Swirls and Art History


Directions:  Look at the list of artists below.  Pick one artist to research.  Use the internet to research the artist, their career, and their life.  Write 2-3 paragraphs summarizing their bio.  Make sure it is in your own words.  NO COPY AND PASTE!
Now find and print 3 images of art made by the artist you chose.

TURN IN TO MRS. HURD BY THE END OF THE HOUR.

TIP* find interesting facts by going to slideshare.net and searching the artist.

Thursday, January 7, 2016

Graphic Design 1st Project

Frog Tongue Exercise 
Learning how to:
  • Open Photoshop
  • Copy & Paste
  • Magic Selection Tool
  • Creating Layers
  • Clone Stamp
  • Naming Layers
  • Saving Documents


Step 1:  Save the below frog and lip images into your student folder or jump drive.
             Right click<save as and save to your folder.


Step 2:  Open images in Photoshop
              <Programs <Adobe Photoshop
              On application bar < File < Open and find your image

Step 3: We will be using the Quick Selection tool to erase the background of the frog picture.
             The icon


Step 4:  Create a new document that is 10x8 inches & 220 ppi- LANDSCAPE
              Go to application bar < File < New
Make sure width and hieght are in inches NOT PIXELS!


Step 5:  This new blank document will be our working canvas.
              Click back to the lips images.  Use the marquee tool to select all of the lips image.
              On the application bar < Edit < Copy
              Go to the blank canvas <Edit < Paste
              <ctrl + T to resize the image to fit the blank canvas
              You have now just created your first layer!!!  YAY!
              Repeat these steps with the frog image.
              This is what everything should look like in photoshop when you are ready to begin the
              exercise.


Step 6:  Watch this video tutorial and follow along.
             Raise your hand anytime you need help.


Graphic Desgin

"Though often overlooked, Graphic Design surrounds us: it is the signs we read, the products we buy, and the rooms we inhabit. Graphic designers find beauty within limitations, working towards the ultimate goal of visually communicating a message, be it the packaging of a product, the spirit of a book, or the narrative of a building. Utilizing a language of type and imagery, graphic designers try to make every aspect of our lives defined and beautiful."


Open (in micro word) or print out the worksheet.  Watch the following pbs offbook video.  Take notes while you watch, and summarize the video under the bullet points provided on the worksheet.  You may type the worksheet or hand write the worksheet.  Make sure to read and follow the directions.


click to download: Graphic design video notes from Natalie Hurd


Click on link for the color theory portion of your worksheet.  Read through the entire website and define the color theory terms on your worksheet.

Click Here:  Color Theory Link


Wednesday, January 6, 2016

Computer Assisted Art


TEXTURES TO USE ON ANDY WARHOL INSPIRED PROJECT:

DIRECTIONS:  Right click and save below images.  Save in your folder or google drive.  Open in Pixlr.  Click select all.  Click copy.  GO TO ANDY WARHOL PROJECT and Click Paste.  Change Opacity and or blending mode.


Benday Dots

Canvas

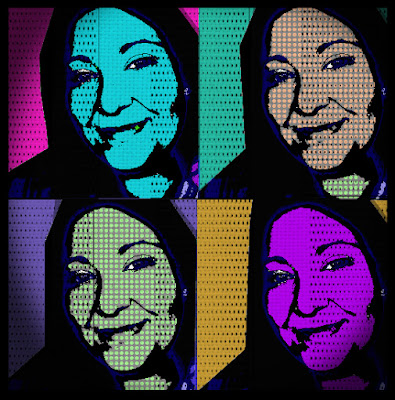
MRS. HURD'S FINSIHED EXAMPLE OF ANDY WARHOL STYLE PORTRAIT USING PIXLR.


DON'T FORGET TO SAVE YOUR PROJECT FOR YOUR PORTFOLIO PROJECT AT THE END OF THE SEMESTER!


Yesterday Recap (Wednesday): Threshold & Sizing
1. Find image and save to personal folder (right click, save image as).
2. Open image using pixlr.com (click file, click open)
3.  Select Image using the marquee tool
4. Copy Image
5.  Create new canvas titled Pop Art Portrait, 800x600
6.  Paste image into new document (Edit, Paste)
7.  Resize image- Edit, Free transform, enter to get out of transform
8.  Use move tool and place in corner- Repeat until you have four equally sized, square images.
9.  Adjust the threshold of each image.  Make sure you are on the correct layer.
10. Save as a pxd file to your personal folder or google doc.

Today (Thursday): Color & Stamp Effect
1.  Open PXD pop art portrait file using pixlr.com/editor
2. If you have a black background you will use the lasso tool to delete it.  It is the second tool icon from the top right tool panel.  Each time you click it will anchor the lasso in place.  You must trace back to where you started and it will turn into a selection.  Once it is selected, hit the delete key.  Now you can use the move tool to move the selection around to each layer, and delete the background-without having to retrace with the lasso tool each time.
3.  Google Andy Warhol Pop up prints for a reference.
4.  Now use the paint bucket tool, and the color selection tool to fill areas with solid color.
5.  Now its time to create a stamp effect.  Make the original image layer visible, and all other layers invisible. (If you had to delete your background earlier, do that again.)
6.  Click Adjustments Click brightness contrast.  Adjust with slider bar.
7.  Click Adjustments Click Posterize.
8. Click Adjustments, Click Invert
9. Click Adjustments, Click Hue Saturation, Click Colorize,
10.  Select with marquee tool, click Edit Click Copy.  Make all other layers visible, and paste what you just created on all four images.  This will give it the "stamped" effect.

Graphic Design Peit Mondrian


Piet mondrian pixlr from Natalie Hurd

Review Ppt, print and complete Notes worksheet.